Official code for "OLViT: Multi-Modal State Tracking via Attention-Based Embeddings for Video-Grounded Dialog" published at LREC-COLING'24
- Python 98.1%
- Shell 1.9%
| checkpoints | ||
| config | ||
| data | ||
| misc | ||
| output | ||
| src | ||
| .gitattributes | ||
| README.md | ||
| setup_data.sh | ||
| test.py | ||
| train.py | ||
OLViT: Multi-Modal State Tracking via Attention-Based Embeddings for Video-Grounded Dialog
Adnen Abdessaied, Manuel von Hochmeister, Andreas Bulling
COLING 2024, Turin, Italy 
[Paper]
Citation
If you find our code useful or use it in your own projects, please cite our paper:
@InProceedings{abdessaied24_coling,
    author    = {Abdessaied, Adnen and Hochmeister, Manuel and Bulling, Andreas},
    title     = {{OLViT: Multi-Modal State Tracking via Attention-Based Embeddings for Video-Grounded Dialog}},
    booktitle = {Proceedings of the International Conference on Computational Linguistics (COLING)},
    month     = {May},
    year      = {2024},
}
Table of Contents
Setup and Dependencies
We implemented our model using Python 3.7, PyTorch 1.11.0 (CUDA 11.3, CuDNN 8.3.2) and PyTorch Lightning. We recommend to setup a virtual environment using Anaconda.
- Install git lfs on your system
- Clone our repository to download a checpint of our best model and our code
git lfs install git clone this_repo.git - Create a conda environment and install dependencies
conda create -n olvit python=3.7
conda activate olvit
conda install pytorch==1.11.0 torchvision==0.12.0 torchaudio==0.11.0 cudatoolkit=11.3 -c pytorch
pip install pytorch-lightning==1.6.3
pip install transformers==4.19.2
pip install torchtext==0.12.0
pip install wandb nltk pandas
Download Data
- DVD and SIMMC 2.1 data are included in this repository and will be downloaded using git lfs
- Setup the data by executing
chmod u+x setup_data.sh ./setup_data.sh - This will unpack all the data necessary in
data/dvd/anddata/simmc/
Training
We trained our model on 3 Nvidia Tesla V100-32GB GPUs. The default hyperparameters need to be adjusted if your setup differs from ours.
DVD
- Adjust the config file for DVD according to your hardware specifications in
config/dvd.json - Execute
CUDA_VISIBLE_DEVICES=0,1,2 python train.py --cfg_path config/dvd.json
- Checkpoints will be saved in
checkpoints/dvd/
SIMMC 2.1
- Adjust the config file for SIMMC 2.1 according to your hardware specifications in
config/simmc.json - Execute
CUDA_VISIBLE_DEVICES=0,1,2 python train.py --cfg_path config/simmc.json
- Checkpoints will be saved in
checkpoints/simmc/
Testing
- Execute
CUDA_VISIBLE_DEVICES=0 python test.py --ckpt_path <PATH_TO_TRAINED_MODEL> --cfg_path <PATH_TO_CONFIG_OF_TRAINED_MODEL>
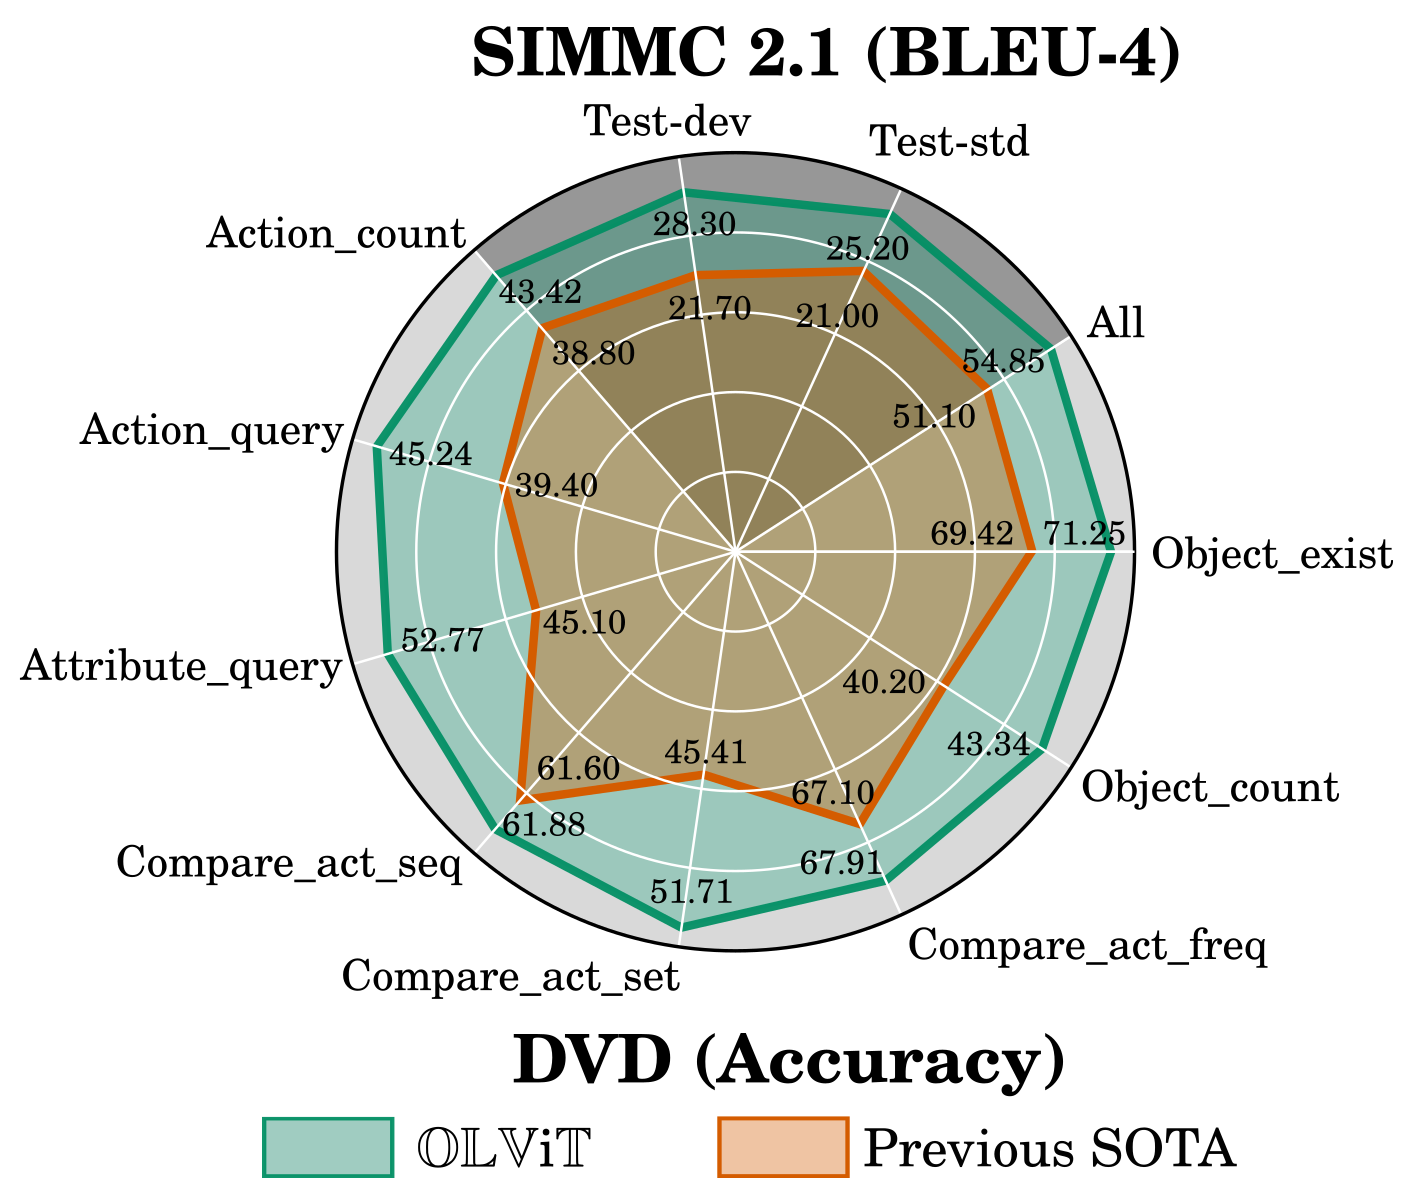
Results
Training using the default config and a similar hardware setup as ours will result in the following performance
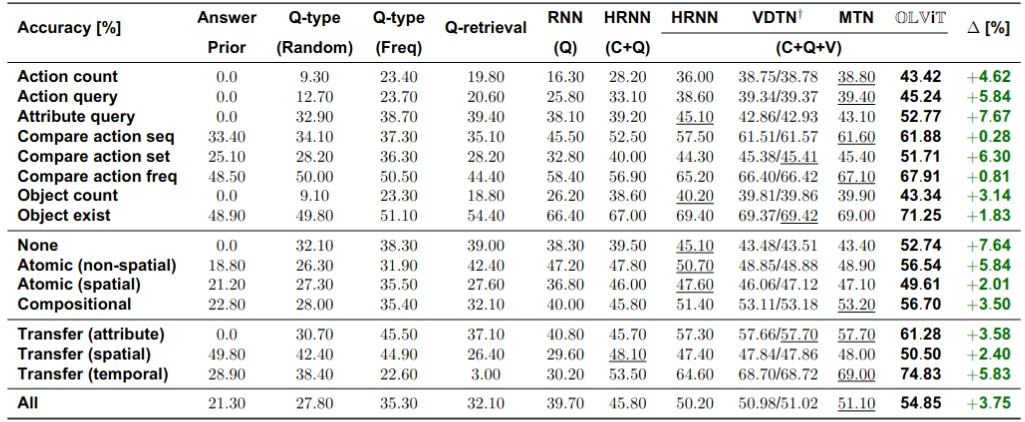
DVD
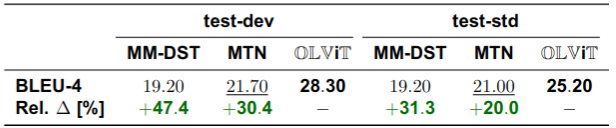
SIMMC 2.1
Acknowledgements
Our work relied on the codebases of DVD and SIMMC. Thanks to the authors for sharing their code.