- Python 99.8%
- Shell 0.2%
| Filename | Latest commit message | Latest commit date |
|---|---|---|
| ckpt | ||
| config | ||
| data | ||
| dataloader | ||
| misc | ||
| models | ||
| utils | ||
| ensemble.py | ||
| main.py | ||
| README.md | ||
| setup_data.sh | ||
VD-GR: Boosting Visual Dialog with Cascaded Spatial-Temporal Multi-Modal GRaphs
Adnen Abdessaied, Lei Shi, Andreas Bulling
WACV'24, Hawaii, USA 
[Paper]
Citation
If you find our code useful or use it in your own projects, please cite our paper:
@InProceedings{Abdessaied_2024_WACV,
    author    = {Abdessaied, Adnen and Shi, Lei and Bulling, Andreas},
    title     = {VD-GR: Boosting Visual Dialog With Cascaded Spatial-Temporal Multi-Modal Graphs},
    booktitle = {Proceedings of the IEEE/CVF Winter Conference on Applications of Computer Vision (WACV)},
    month     = {January},
    year      = {2024},
    pages     = {5805-5814}
}
Table of Contents
Setup and Dependencies
We implemented our model using Python 3.7 and PyTorch 1.11.0 (CUDA 11.3, CuDNN 8.2.0). We recommend to setup a virtual environment using Anaconda.
- Install git lfs on your system
- Clone our repository to download the data, checkpoints, and code
git lfs install git clone https://git.hcics.simtech.uni-stuttgart.de/public-projects/VDGR.git - Create a conda environment and install dependencies
conda create -n vdgr python=3.7 conda activate vdgr conda install pytorch==1.11.0 torchvision==0.12.0 torchaudio==0.11.0 cudatoolkit=11.3 -c pytorch conda install pyg -c pyg # 2.1.0 pip install pytorch-transformers pip install pytorch_pretrained_bert pip install pyhocon glog wandb lmdb - If you wish to speed-up training, we recommend installing apex
git clone https://github.com/NVIDIA/apex
cd apex
# if pip >= 23.1 (ref: https://pip.pypa.io/en/stable/news/#v23-1) which supports multiple `--config-settings` with the same key...
pip install -v --disable-pip-version-check --no-cache-dir --no-build-isolation --config-settings "--build-option=--cpp_ext" --config-settings "--build-option=--cuda_ext" ./
# otherwise
pip install -v --disable-pip-version-check --no-cache-dir --no-build-isolation --global-option="--cpp_ext" --global-option="--cuda_ext" ./
cd ..
Download Data
- Download the extacted visual features of VisDial and setup all files we used in our work. We provide a shell script for convenience:
./setup_data.sh # Please make sure you have enough disk space
If everything was correctly setup, the data/ folder should look like this
├── history_adj_matrices
│   ├── test
│        ├── *.pkl
│   ├── train
│        ├── *.pkl
│   ├── val
│        ├── *.pkl
├── question_adj_matrices
│   ├── test
│        ├── *.pkl
│   ├── train
│        ├── *.pkl
│   ├── val
│        ├── *.pkl
├── img_adj_matrices
│   ├── *.pkl
├── parse_vocab.pkl
├── test_dense_mapping.json
├── tr_dense_mapping.json
├── val_dense_mapping.json
├── visdial_0.9_test.json
├── visdial_0.9_train.json
├── visdial_0.9_val.json
├── visdial_1.0_test.json
├── visdial_1.0_train_dense_annotations.json
├── visdial_1.0_train_dense.json
├── visdial_1.0_train.json
├── visdial_1.0_val_dense_annotations.json
├── visdial_1.0_val.json
├── visdialconv_dense_annotations.json
├── visdialconv.json
├── vispro_dense_annotations.json
└── vispro.json
Pre-trained Checkpoints
For convenience, we provide checkpoints of our model after the warm-up training stage in ckpt/ for both VisDial v1.0 and VisDial v0.9.
These checkpoints will be downloaded with the code if you use git lfs.
Training
We trained our model on 8 Nvidia Tesla V100-32GB GPUs. The default hyperparameters in config/vdgr.conf and config/bert_base_6layer_6conect.json need to be adjusted if your setup differs from ours.
Phase 1
Training
- In this phase, we train our model on VisDial v1.0 via
CUDA_VISIBLE_DEVICES=0,1,2,3,4,5,6,7 python main.py \
--model vdgr/P1 \
--mode train \
--tag K2_v1.0 \
--wandb_mode online \
--wandb_project your_wandb_project_name
⚠️ On a similar setup to ours, this will take roughly 20h to complete using apex for training.
- To train on VisDial v0.9:
- Set
visdial_version = 0.9inconfig/vdgr.conf - Set
start_path = ckpt/vdgr_visdial_v0.9_after_warmup_K2.ckptinconfig/vdgr.conf - Run
CUDA_VISIBLE_DEVICES=0,1,2,3,4,5,6,7 python main.py \ --model vdgr/P1 \ --mode train \ --tag K2_v0.9 \ --wandb_mode online \ --wandb_project your_wandb_project_name - Set
Inference
- For inference on VisDial v1.0 val, VisDialConv, or VisPro:
- Set
eval_dataset = {visdial, visdial_conv, visdial_vispro}inlogs/vdgr/P1_K2_v1.0/code/config/vdgr.conf - Run
CUDA_VISIBLE_DEVICES=0,1,2,3,4,5,6,7 python main.py \ --model vdgr/P1 \ --mode eval \ --eval_dir logs/vdgr/P1_K2_v1.0 \ --wandb_mode offline \ - Set
- For inference on VisDial v0.9:
- Set
eval_dataset = visdialinlogs/vdgr/P1_K2_v0.9/code/config/vdgr.conf - Run
CUDA_VISIBLE_DEVICES=0,1,2,3,4,5,6,7 python main.py \ --model vdgr/P1 \ --mode eval \ --eval_dir logs/vdgr/P1_K2_v0.9 \ --wandb_mode offline \ - Set
⚠️ This might take some time to finish as the testing data of VisDial v0.9 is large.
- For inference on the
visdial_v1.0 test:- Run
CUDA_VISIBLE_DEVICES=0,1,2,3,4,5,6,7 python main.py \ --model vdgr/P1 \ --mode predict \ --eval_dir logs/vdgr/P1_K2_v1.0 \ --wandb_mode offline \- The output file will be saved in
output/
Phase 2
In this phase, we finetune on dense annotations to improve the NDCG score (Only supported for VisDial v1.0.)
- Run
CUDA_VISIBLE_DEVICES=0,1,2,3,4,5,6,7 python main.py \
--model vdgr/P2_CE \
--mode train \
--tag K2_v1.0_CE \
--wandb_mode online \
--wandb_project your_wandb_project_name
⚠️This will take roughly 3-4 hours to complete using the same setup as before and DP for training.
- For inference on VisDial v1.0:
- Run:
CUDA_VISIBLE_DEVICES=0,1,2,3,4,5,6,7 python main.py \ --model vdgr/P2_CE \ --mode predict \ --eval_dir logs/vdgr/P1_K2_v1.0_CE \ --wandb_mode offline \- The output file will be saved in
output/
Phase 3
Training
In the final phase, we train an ensemble method comprising of 8 models using K={1,2,3,4} and dense_loss={ce, listnet}.
For K=k:
- Set the value of
num_v_gnn_layers, num_q_gnn_layers, num_h_gnn_layerstok - Set
start_path = ckpt/vdgr_visdial_v1.0_after_warmup_K[k].ckptinconfig/vdgr.conf(P1) - Phase 1 training:
CUDA_VISIBLE_DEVICES=0,1,2,3,4,5,6,7 python main.py \
--model vdgr/P1 \
--mode train \
--tag K[k]_v1.0 \
--wandb_mode online \
--wandb_project your_wandb_project_name
- Set
start_path = logs/vdgr/P1_K[k]_v1.0/epoch_best.ckptinconfig/vdgr.conf(P2) - Phase 2 training:
- Fine-tune with CE:
CUDA_VISIBLE_DEVICES=0,1,2,3,4,5,6,7 python main.py \
--model vdgr/P2_CE \
--mode train \
--tag K[k]_v1.0_CE \
--wandb_mode online \
--wandb_project your_wandb_project_name
- Fine-tune with LISTNET:
CUDA_VISIBLE_DEVICES=0,1,2,3,4,5,6,7 python main.py \
--model vdgr/P2_LISTNET \
--mode train \
--tag K[k]_v1.0_LISTNET \
--wandb_mode online \
--wandb_project your_wandb_project_name
Inference
- For inference on VisDial v1.0 test:
CUDA_VISIBLE_DEVICES=0,1,2,3,4,5,6,7 python main.py \
--model vdgr/P2_[CE,LISTNET] \
--mode predict \
--eval_dir logs/vdgr/P2_K[1,2,3,4]_v1.0_[CE,LISTNET] \
--wandb_mode offline \
- Finally, merge the outputs of all models
 python ensemble.py \
--exp test \
--mode predict \
The output file will be saved in output/
Results
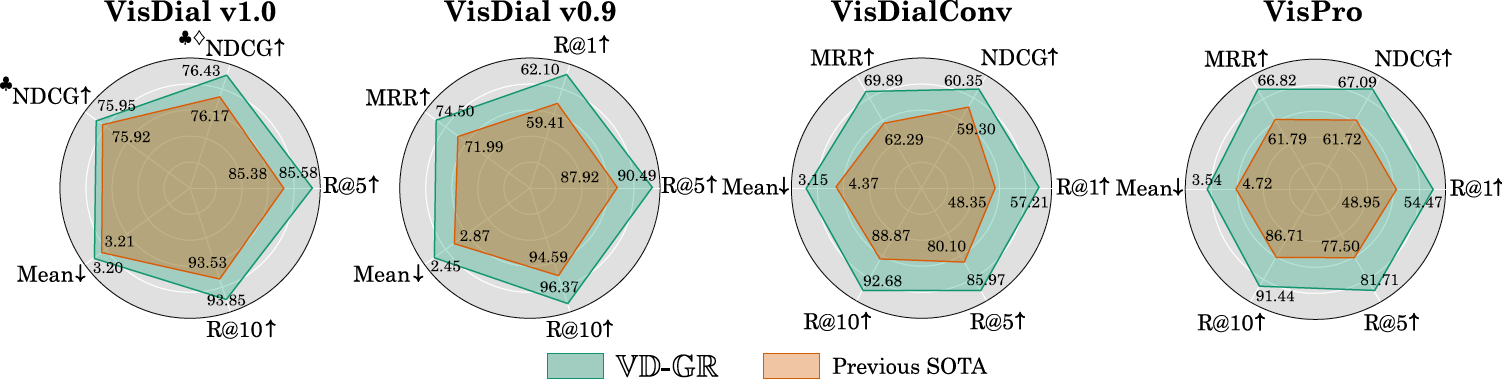
VisDial v0.9
| Model | MRR | R@1 | R@5 | R@10 | Mean |
|---|---|---|---|---|---|
| Prev. SOTA | 71.99 | 59.41 | 87.92 | 94.59 | 2.87 |
| VD-GR | 74.50 | 62.10 | 90.49 | 96.37 | 2.45 |
VisDialConv
| Model | NDCG | MRR | R@1 | R@5 | R@10 | Mean |
|---|---|---|---|---|---|---|
| Prev. SOTA | 61.72 | 61.79 | 48.95 | 77.50 | 86.71 | 4.72 |
| VD-GR | 67.09 | 66.82 | 54.47 | 81.71 | 91.44 | 3.54 |
VisPro
| Model | NDCG | MRR | R@1 | R@5 | R@10 | Mean |
|---|---|---|---|---|---|---|
| Prev. SOTA | 59.30 | 62.29 | 48.35 | 80.10 | 88.87 | 4.37 |
| VD-GR | 60.35 | 69.89 | 57.21 | 85.97 | 92.68 | 3.15 |
VisDial V1.0 Val
| Model | NDCG | MRR | R@1 | R@5 | R@10 | Mean |
|---|---|---|---|---|---|---|
| Prev. SOTA | 65.47 | 69.71 | 56.79 | 85.82 | 93.64 | 3.15 |
| VD-GR | 64.32 | 69.91 | 57.01 | 86.14 | 93.74 | 3.13 |
VisDial V1.0 Test
| Model | NDCG | MRR | R@1 | R@5 | R@10 | Mean |
|---|---|---|---|---|---|---|
| Prev. SOTA | 64.91 | 68.73 | 55.73 | 85.38 | 93.53 | 3.21 |
| VD-GR | 63.49 | 68.65 | 55.33 | 85.58 | 93.85 | 3.20 |
| ♣️ Prev. SOTA | 75.92 | 56.18 | 45.32 | 68.05 | 80.98 | 5.42 |
| ♣️ VD-GR | 75.95 | 58.30 | 46.55 | 71.45 | 84.52 | 5.32 |
| ♣️♦️ Prev. SOTA | 76.17 | 56.42 | 44.75 | 70.23 | 84.52 | 5.47 |
| ♣️♦️ VD-GR | 76.43 | 56.35 | 45.18 | 68.13 | 82.18 | 5.79 |
♣️ = Finetuning on dense annotations, ♦️ = Ensemble model
Contributors
For any questions or enquiries, don't hesitate to contact the above contributor(s).